Use Obsidian Everywhere
Obsidian is “a knowledge base that works on local Markdown files”, or in other words, a system to organize your thoughts, keep notes, and to build ‘a second brain’. It does all of that using plain Markdown files that are stored locally. You are in control. All of that for free.
That control is great. You are not dependant on a third party to access your notes. In 10 years, plain text files will still be there and accessible.
One of the downsides is that you’re also responsible yourself for not losing your data.
There are multiple ways to take care of data synchronisation and to keep data safe. One way is to subscribe to the Obsidian Sync service, which is a monthly subscription that for a fee takes care of all the synchronisation needs you have. A good way to show your support to the Obsidian developers, and to make further development possible.
If you’re just starting out, and don’t want to make the plunge yet, there are ways to set-up synchronisation yourself, so you can use Obsidian on any device you like. One that works the best for me across different kind of devices is using the ‘remotely-save’ plugin together with an S3 bucket.
Setting it up
Prerequisites:
- Scaleway Account
For this example I’m using Scaleway Object Storage, as they provide 75GB of free storage. Note that for other S3 compatible services this setup will be very similar.
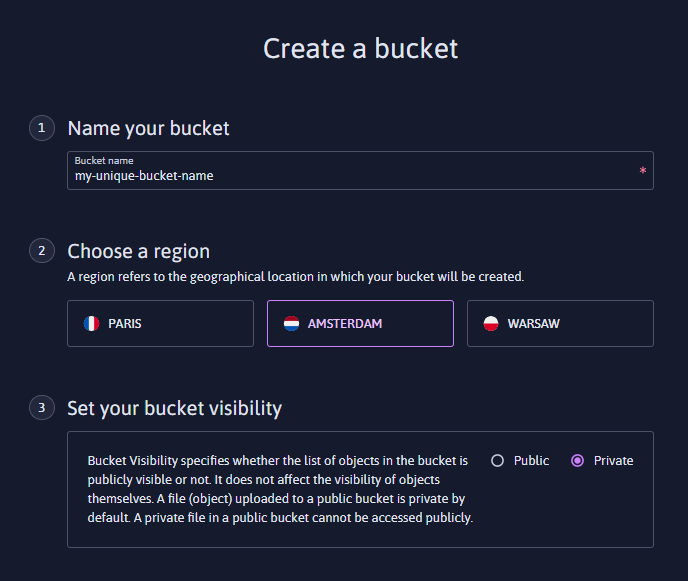
Step 1: Create a Bucket
To create a bucket, go to Object Storage and click on the ‘+ Create a bucket’ button. Choose a name and region. Make sure the bucket visibility is set to ‘Private’. To finish, click on ‘Create a bucket’ at the bottom of the page.
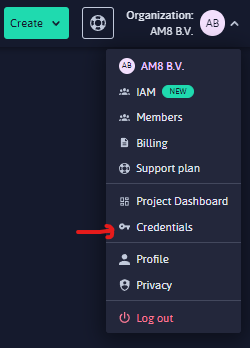
Step 2: Create Access Key
Create a new API Key for Remotely Save in the Credentials page. To get there, click on your (organization) name, and select ‘Credentials’. On the Credentials page, click on ‘+ Generate new API key’. Write a descriptive purpose, like ‘Obsidian - Remotely Save’ and click on the Generate button. Be sure to copy these values so you can use them in Step 4.
Step 3: Install remotely-save
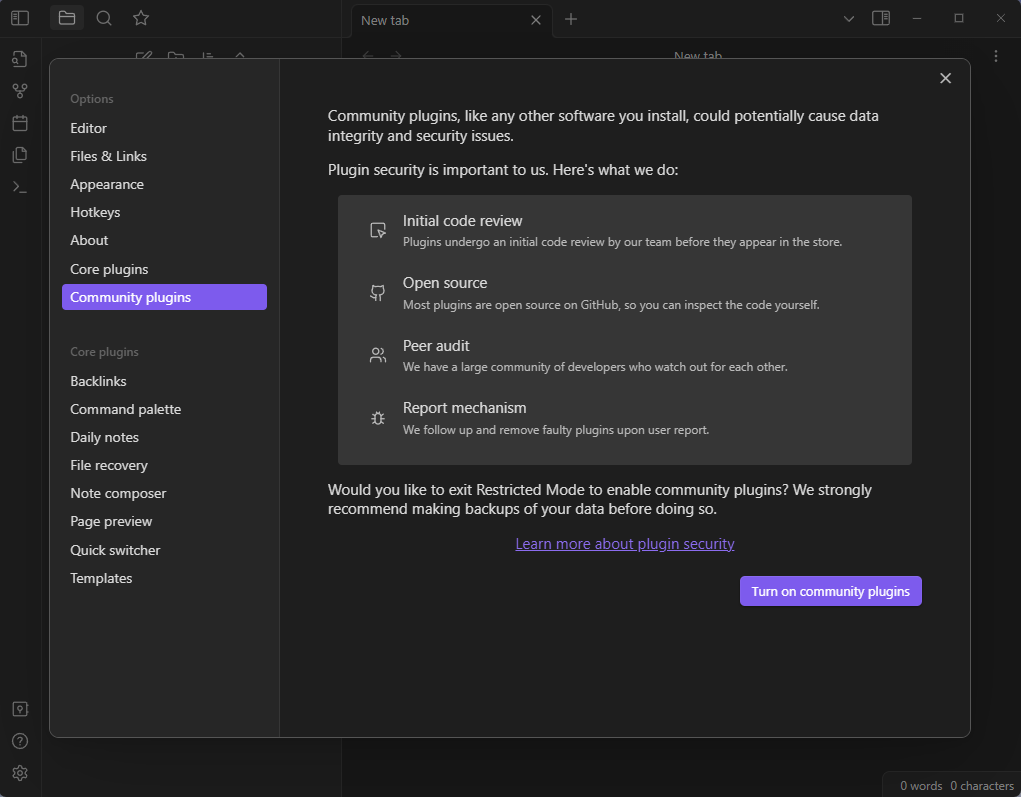
Plugins are installed and configured per vault, so ensure you have opened the Vault you want to synchronize. To install the ‘remotely-save’ plugin, click on the gear wheel icon to open the Settings page. Go to the ‘Community plugins’ tab, and click on ‘Turn on community plugins’ if you’re asked.
Click on ‘Browse’ and search for ‘Removely Save’. Click on it, and click on ‘Install’. This should not take more than a few seconds. Keep the window open and click on ‘Enable’, before closing the search window.
Now you’ll see a new tab on the left in the Settings page called ‘Remotely Save’. Click on it, and you’ll be greeted with the settings for this plugin for this Vault.
Step 4: Configure remotely-save
Fill in the configuration based on the previously created bucket name and generated API key. Note that you’ll have to replace ’nl-ams’ with ‘fr-par’, or ‘pl-waw’ if you created a bucket in Paris or Warsaw respectively.
| Setting | Value |
|---|---|
| Endpoint | https://s3.nl-ams.scw.cloud (replace nl-ams with fr-par, or pl-waw if the bucket is in Paris or Warsaw) |
| Region | nl-ams |
| Access Key ID | < Access Key ID (Step 2) > |
| Secret Access Key | < Secret Access Key (Step 2) > |
| Bucket Name | < Bucket Name (Step 1) > |
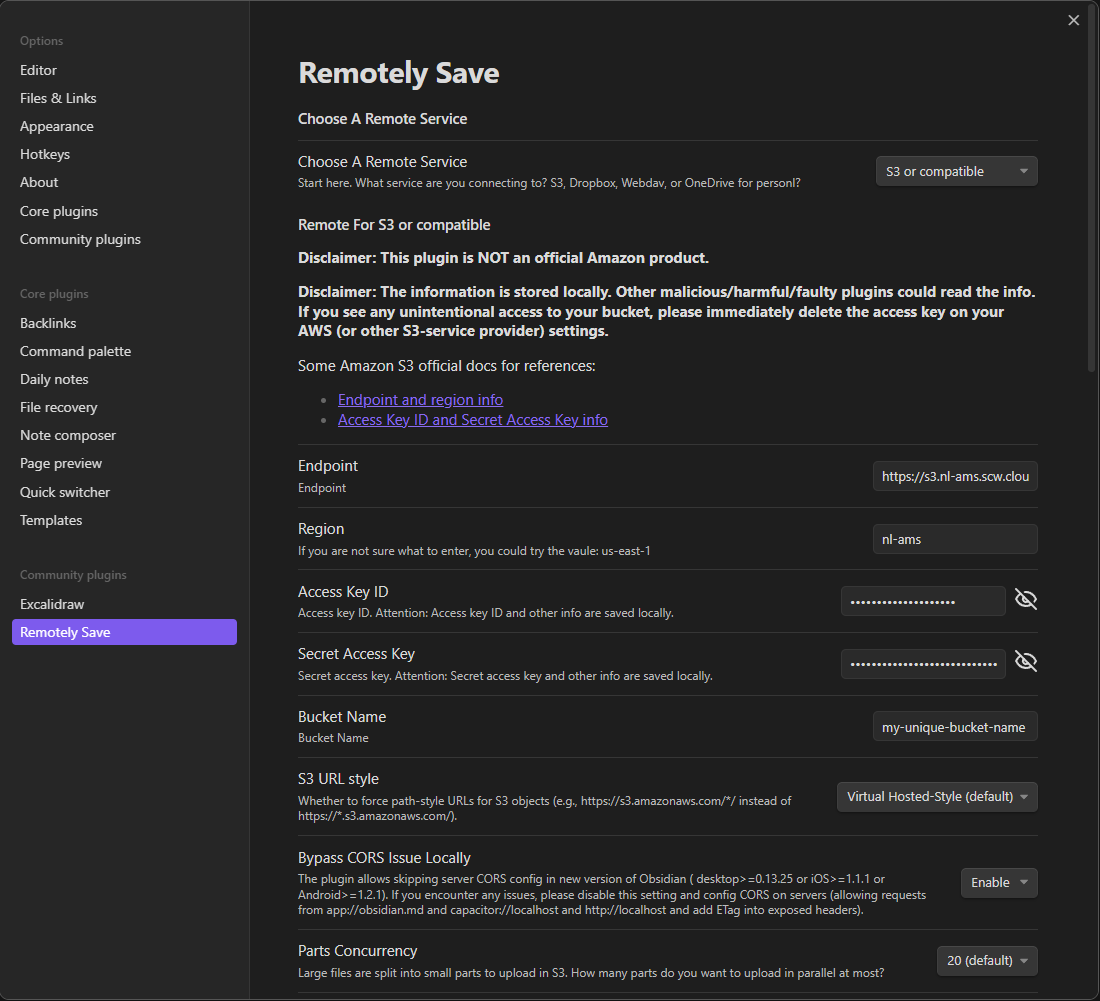
After you filled in these values, be sure to scroll down and click on ‘Check’ to check the connectivity to the S3 bucket, and validating the credentials. You can leave other settings to default, but there are some that you might want to change too.
| Setting | Value | Purpose |
|---|---|---|
| Encryption Password | < Choose your own password > | E2E Encryption. Note: password is saved locally. |
| Schedule For Auto Run | every 10 minutes | Automatic synchronization. If this is disabled, it will only synchronize on command. |
| Run Once On Start Up Automatically | sync once after 10 seconds | Synchronization when opening Obsidian. |
Step 5: Add other device(s)
Of course, you can use the same settings as you’ve just filled in to configure synchronization to/from other devices, but there’s a simpler way: The easiest way to add other devices is to click on the ‘Get QR Code’ button in the Remotely Save settings page. From your phone, you can scan this QR code to setup synchronization. If your device doesn’t have a camera, there’s also the option to copy the special URI and send it in a different way.
Conclusion
If you’ve followed all the steps there’s only one thing left to do: Write.